
The Best Grilled Beer Can Chicken with BBQ Dry Rub — Juicy, Smoky, and Ready to Steal the Show at Your Next Cookout
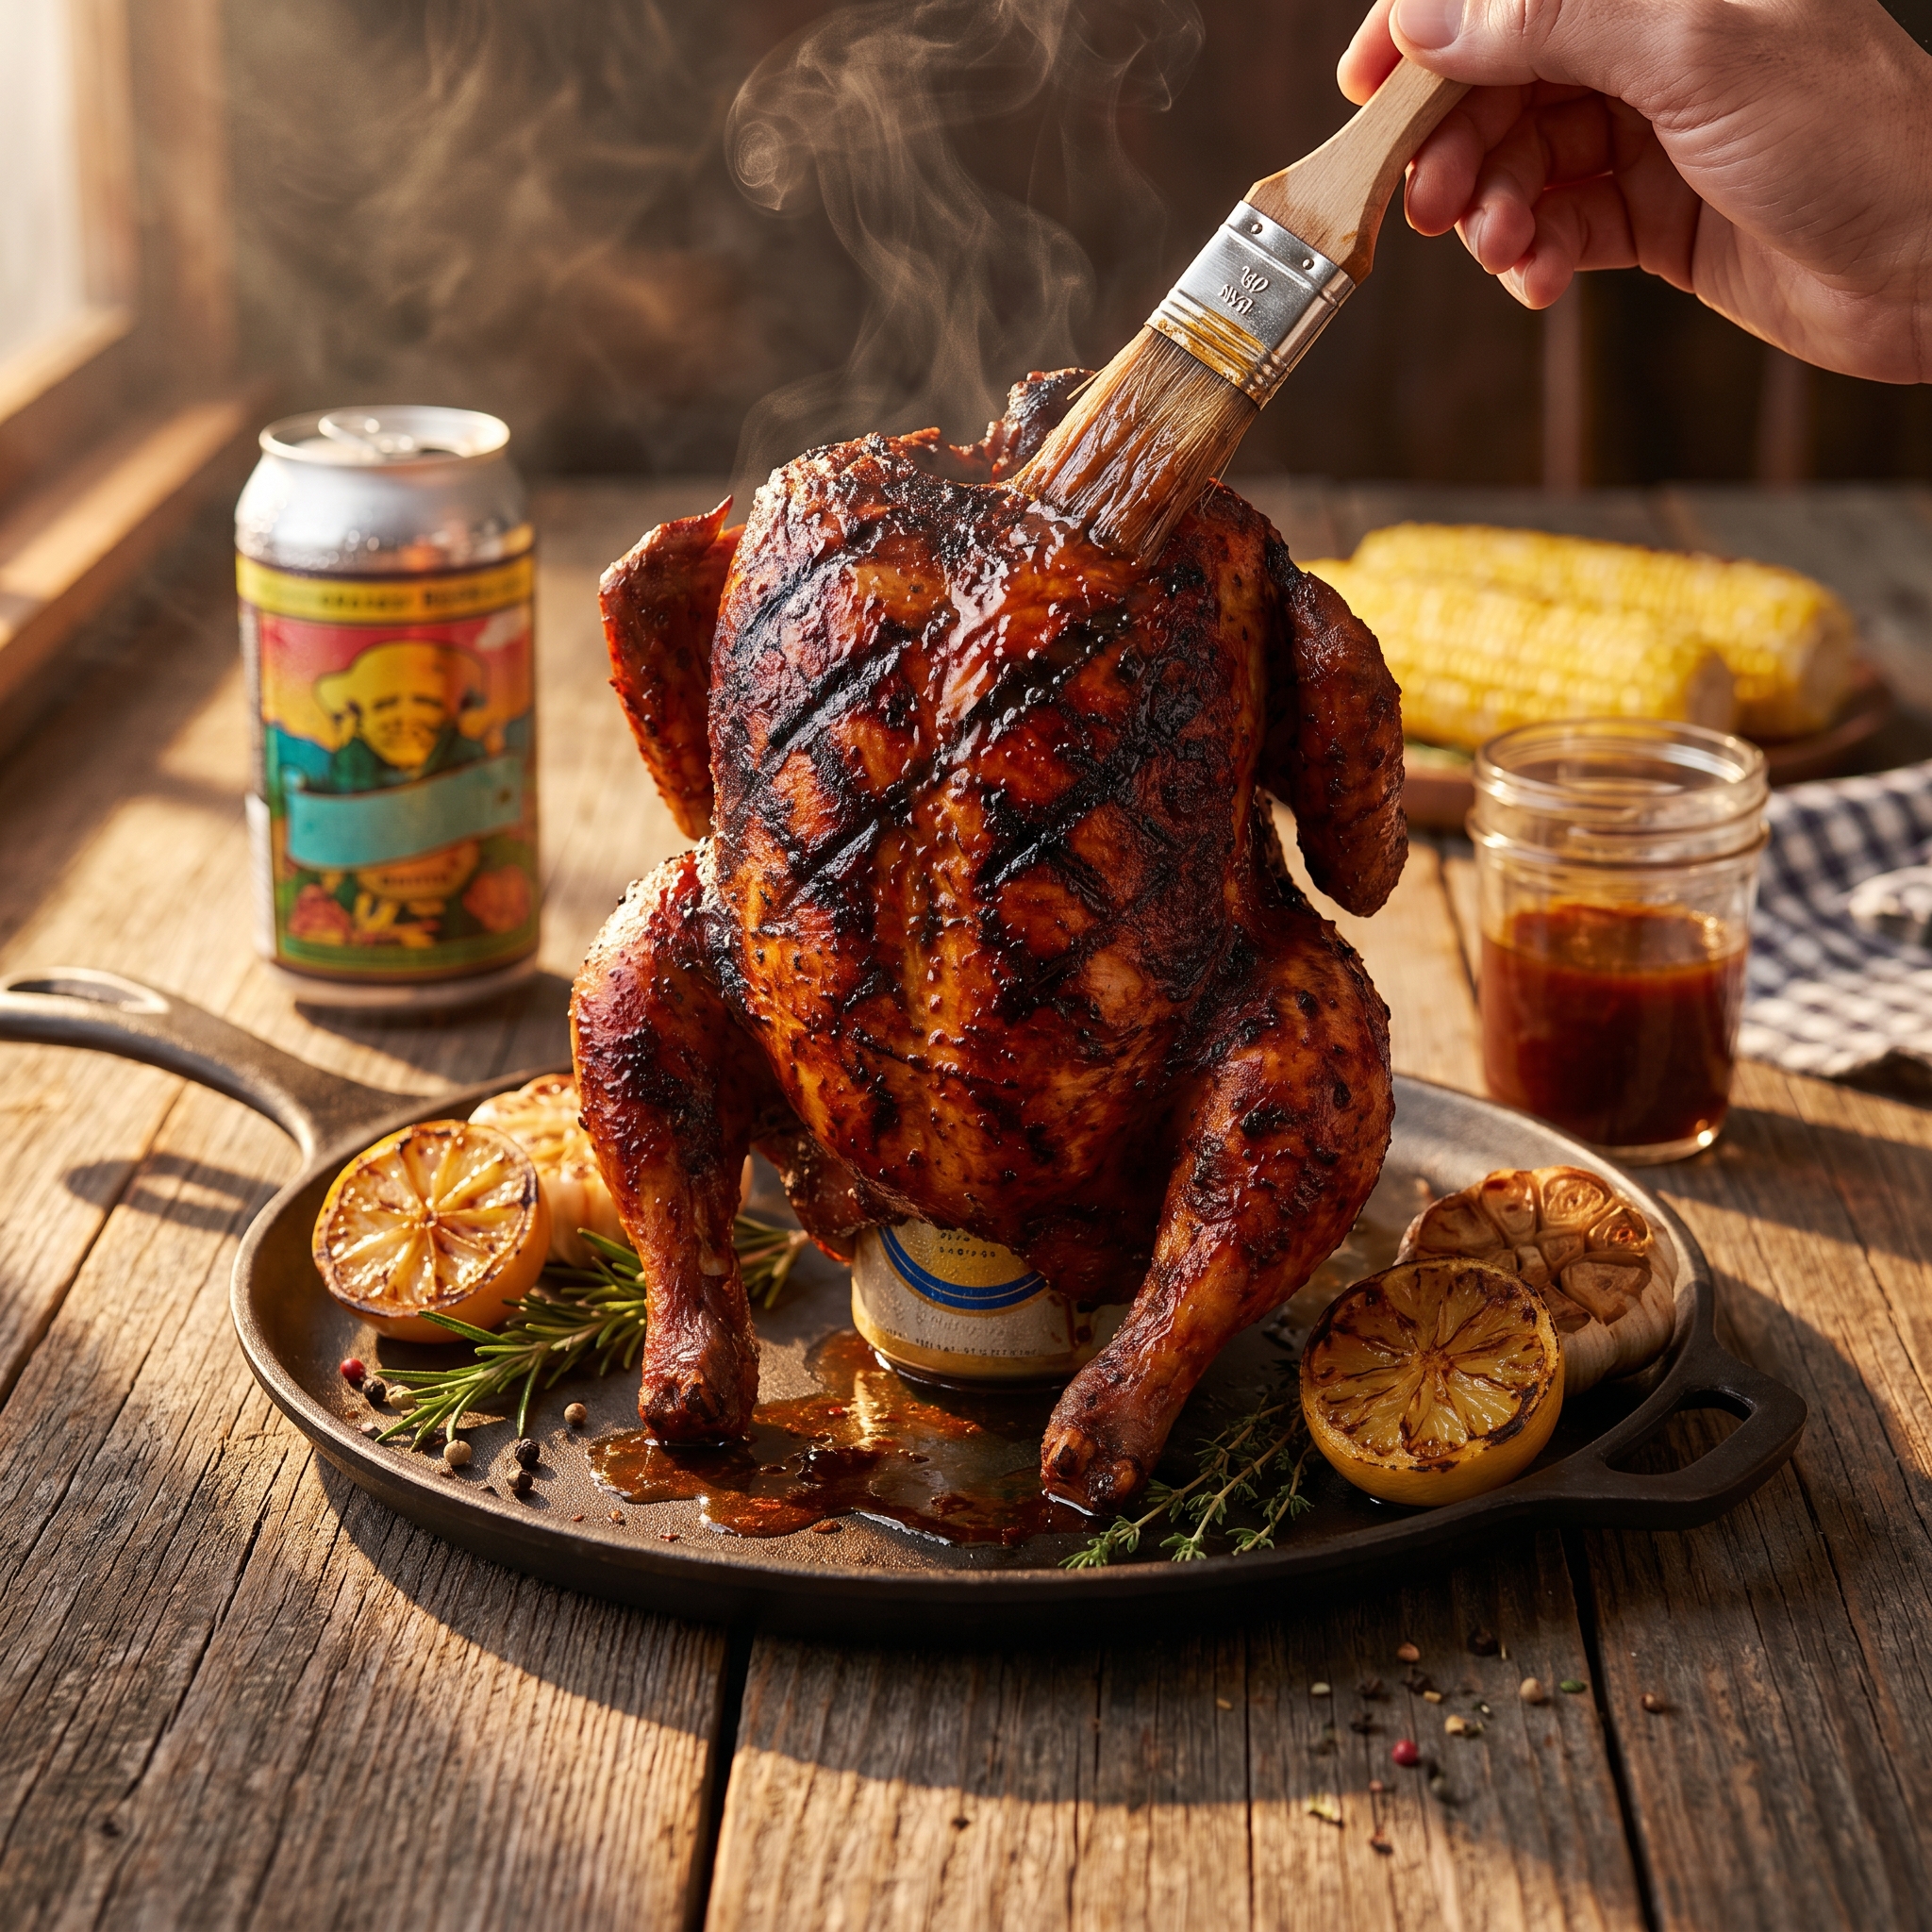
Imagine carrying a whole golden-brown, smoke-kissed chicken off the grill while every single person in the backyard stops their conversation and turns to stare. That’s the power of grilled beer can chicken with BBQ dry rub — it looks like a showstopper, smells absolutely incredible, and tastes like something that took way more skill than it actually did. Honestly? That’s my favorite kind of recipe.
Have you ever bitten into a piece of grilled chicken that was so juicy it practically dripped down your hand, with a thick, smoky bark on the outside that crackled when you bit through it? That’s exactly what you get here — every single time. The beer steams the bird from the inside while the grill works that BBQ dry rub into a deep, caramelized crust on the outside. The result is the most flavorful, foolproof whole chicken you will ever pull off a grill.
Whether you’re firing up the grill for a Fourth of July cookout, a Memorial Day backyard bash, or just a lazy Sunday afternoon with the neighbors, this recipe is the one that gets requested again and again. Keep reading — I’m walking you through every single step, every tip I’ve learned the hard way, and the dry rub blend that people have been asking me to bottle and sell for years.
Table of Contents
Why This Recipe Works
There are a hundred ways to cook a whole chicken. Here’s why grilled beer can chicken with BBQ dry rub beats them all:
- ✔ The beer-steam method keeps the meat unbelievably moist from the inside out — no brining, no basting, no babysitting required
- ✔ The BBQ dry rub builds a gorgeous, crackling bark on the skin that locks in all the juices and delivers bold, smoky flavor in every bite
- ✔ Indirect heat grilling means you’re not standing over the grill constantly flipping things — set it up and let the grill do the work
- ✔ Feeds a crowd for pennies — one whole chicken feeds 4–6 people for a fraction of the cost of takeout or restaurant BBQ
- ✔ Impressive enough for company, easy enough for a Tuesday — seriously, this recipe is more foolproof than it looks
- ✔ Works on any grill — gas, charcoal, or pellet smoker, this method delivers every time
- ✔ Leftovers are gold — shred the extra chicken for tacos, sandwiches, salads, or soup the next day
Once you understand the simple science behind why this method works so well, you’ll never cook a whole chicken any other way. Let’s talk about what goes into making it happen.
What You’ll Need
Simple ingredients, big flavors — this is backyard BBQ at its absolute best.
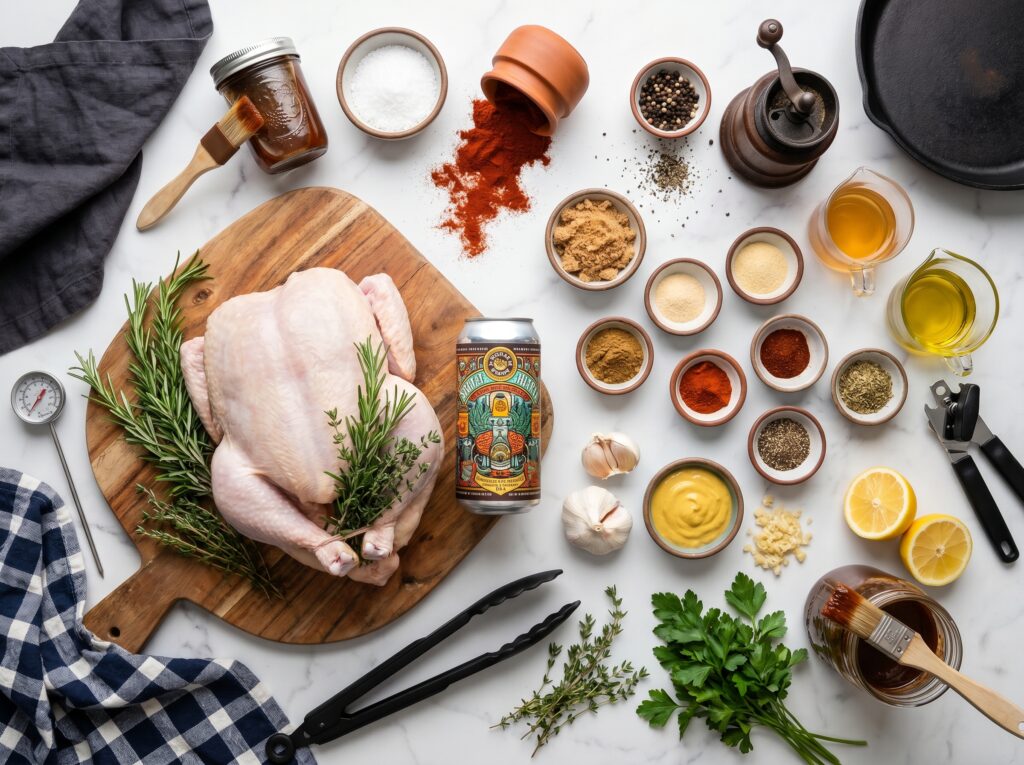
For the Chicken
- 1 whole chicken (3½ to 4½ lbs) — patted completely dry
- 1 can (12 oz) of beer, room temperature (lager or pale ale works best)
- 2 tablespoons olive oil or vegetable oil
For the BBQ Dry Rub
- 2 tablespoons brown sugar, packed
- 1 tablespoon smoked paprika
- 1 tablespoon kosher salt
- 1½ teaspoons garlic powder
- 1½ teaspoons onion powder
- 1 teaspoon black pepper, freshly ground
- 1 teaspoon chili powder
- ½ teaspoon cayenne pepper (adjust to your heat preference)
- ½ teaspoon dried mustard powder
- ½ teaspoon dried oregano
- ½ teaspoon ground cumin
Optional (But Highly Recommended) Add-Ons
- 2–3 tablespoons of your favorite BBQ sauce, brushed on during the last 15 minutes of cooking
- A few sprigs of fresh thyme or rosemary to drop inside the cavity before grilling
- 2 garlic cloves, smashed, to add to the beer can
Substitutions
Not a beer drinker or cooking for kids? No problem at all. Substitute the beer with a can of chicken broth, ginger ale, root beer, or even Dr Pepper. Any liquid that produces steam works — the flavor it imparts is subtle, but it absolutely keeps the meat juicy and tender throughout the long cook.
No brown sugar? White granulated sugar or coconut sugar works as a 1-to-1 swap. The brown sugar is preferred because its molasses content deepens the color of the bark and adds a subtle caramel note — but any sweetener will help that crust form.
Don’t have smoked paprika? Regular paprika plus an extra ¼ teaspoon of cumin gets you close, or add a small chunk of hardwood to your grill for real smoke flavor that makes up the difference.
🧑🍳 Chef’s Note — The Dry Rub: The brown sugar in this rub is doing double duty. It balances the heat from the cayenne and chili powder, and more importantly, it caramelizes over the heat of the grill to form that crackling, lacquered bark on the outside of the bird. Don’t skip it or reduce it — it’s the secret to that dark, gorgeous crust.
🧑🍳 Chef’s Note — The Beer: A classic American lager like Bud, Coors, or Miller is the traditional choice — nothing fancy needed here. The beer flavor is very mild once cooked, so don’t overthink it. What matters is the steam. If you do want to add a flavor dimension, a pale ale or amber adds a gentle hoppy note that pairs beautifully with the smoky rub.
How to Make Grilled Beer Can Chicken with BBQ Dry Rub — Step by Step
- Mix your BBQ dry rub. Combine all the dry rub ingredients in a small bowl and stir until everything is evenly blended. Spread it out on a plate for easy application. This rub keeps for up to 3 months in an airtight jar — make a double batch and thank yourself later.
- Prep the chicken. Remove any giblets from the cavity and pat the entire bird completely dry with paper towels — inside and out. Dry skin is the foundation of a crispy, crackling exterior. Rub the oil all over the chicken first, getting into every nook, then apply the dry rub generously over every surface: the breast, the thighs, the back, the wings, and inside the cavity. Press the rub in firmly so it adheres.
- Prep the beer can. Open the beer and pour out (or drink) about one-third of it — this creates space so the beer doesn’t boil over inside the cavity, which can make a mess on your grill. If you’d like, drop in 2 smashed garlic cloves and a sprig of rosemary or thyme through the opening to add a subtle aroma while it steams.
- Mount the chicken on the can. Stand the beer can upright on a stable surface and carefully lower the chicken cavity-down over the can. The bird should sit upright with the can fully inside the cavity. Position the two legs forward and the wings out slightly so the chicken sits like a stable tripod — you want it to stand tall and balanced on the grill.
- Set up your grill for indirect heat. This is the most important grill technique in this entire recipe. For a gas grill: light the outer burners to medium-high (around 375°F) and leave the center burner OFF — the chicken goes in the center, over the unlit burner. For a charcoal grill: push your lit coals to both sides, leaving the center empty, then place a disposable drip pan in the center under where the chicken will sit. Target a grill temperature of 350°F–375°F.
- Grill low and slow. Carefully transfer the chicken-on-can to the center of the grill over indirect heat. Close the lid and cook for 60–90 minutes, depending on the size of your bird. Do not open the lid every few minutes — resist the urge. You want to maintain a steady 350°F–375°F inside the grill. One peek every 30 minutes is plenty.
- Check for doneness. The chicken is done when a meat thermometer inserted into the thickest part of the thigh (not touching bone) reads 165°F. The skin should be a deep mahogany brown all over, the legs should wiggle loosely in the joint, and the juices should run clear when you pierce the thigh. Don’t rely on time alone — always check the temp.
- Rest before carving. Very carefully remove the chicken from the grill using tongs and oven mitts — the beer can and the liquid inside are extremely hot. Let the whole bird rest upright or on its side for at least 10–15 minutes before carving. Resting lets the juices redistribute throughout the meat so every single bite is as juicy as the last.
- Carve and serve. Remove the beer can carefully (use a towel — it’s hot), then carve the chicken into quarters or pieces. Arrange on a platter, drizzle with any collected drip pan juices, and serve with all your favorite BBQ sides. Stand back and soak up the compliments.
Now that you’ve got a perfectly grilled bird in front of you, let’s talk about how to serve it like a true pitmaster.
How to Serve It
This grilled beer can chicken with BBQ dry rub was made for the full backyard cookout experience. Here are my favorite ways to serve it:
- 🇺🇸 Fourth of July or Memorial Day cookout centerpiece: Place the whole carved chicken on a big wooden board surrounded by grilled corn, baked beans, and coleslaw. It’s the most patriotic plate imaginable and will absolutely steal the spotlight from the burgers and dogs.
- 🍽️ Classic Sunday dinner: Serve with creamy mashed potatoes, green beans, and cornbread for a Sunday supper that tastes like pure comfort. This is the kind of meal that brings everyone to the table without being asked twice.
- 🥗 Shredded chicken bowls: Pull any leftover meat and serve over cilantro-lime rice with black beans, grilled peppers, and a drizzle of BBQ sauce. It’s a full weeknight meal that takes five minutes to assemble.
- 🥪 BBQ chicken sandwiches: Pile shredded leftover chicken onto toasted brioche buns with extra BBQ sauce and a scoop of coleslaw on top. This is arguably better than the original dinner and the number one reason I always cook a bigger bird than I think I need.
- 🌽 Game day or tailgate spread: Quarter the chicken and serve alongside loaded potato skins, grilled jalapeño poppers, and ice-cold drinks. Beer can chicken at a tailgate is a legitimate power move that no chip-and-dip platter can compete with.
However you serve it, don’t let a single bite go to waste — the leftover possibilities are almost as exciting as the main event.
Storage & Leftovers
Refrigerator: Store leftover chicken in an airtight container or wrapped tightly in foil in the fridge for up to 4 days. Pull the meat off the bones and store it shredded or in pieces — it takes up less space and reheats more evenly.
Freezer: Shredded or sliced leftover chicken freezes beautifully for up to 3 months. Portion it into zip-lock freezer bags, press out the air, label with the date, and freeze flat. Thaw overnight in the fridge for the best texture.
Counter: Do not leave cooked chicken sitting out for more than 2 hours. Always refrigerate promptly — food safety first, always.
📅 Make-Ahead Tip: Mix your BBQ dry rub up to a month in advance and store it in an airtight jar in the pantry — it keeps perfectly and is ready to go whenever the grilling mood strikes. Season the bird the night before and let it rest uncovered in the fridge overnight for the absolute deepest flavor and crispiest skin. This is the single biggest upgrade you can make to this recipe.
Reheating (Oven — Best Method): Place chicken pieces on a baking sheet, cover loosely with foil, and reheat in a 325°F oven for 15–20 minutes until warmed through. Remove the foil for the last 5 minutes to re-crisp the skin. This method keeps the meat moist and brings the skin back to life.
Reheating (Microwave — Quick Option): Place chicken pieces on a microwave-safe plate, cover with a damp paper towel, and heat on MEDIUM power for 90 seconds to 2 minutes. The skin won’t be crispy, but the meat stays juicy. Good for a quick lunch — not ideal for company.
Helpful Tips & Common Mistakes
Beer can chicken looks dramatic, but a few rookie mistakes can get between you and the perfect bird. Here’s exactly what to avoid:
✗ Mistake: Cooking the chicken over direct heat.
✓ Fix: Indirect heat is non-negotiable. Direct heat burns the exterior before the inside is cooked through and causes massive flare-ups from the dripping fat. Always set up a two-zone fire and put the chicken on the cool side with the lid closed.
✗ Mistake: Not patting the chicken dry before applying the rub.
✓ Fix: Moisture on the skin creates steam, which prevents browning and crisping. Pat it bone dry, rub it with oil first, then apply the dry rub. Dry skin is the foundation of a crackling, bark-like exterior.
✗ Mistake: Using a full, unopened can of beer.
✓ Fix: Always pour out or drink about a third of the beer first. A completely full can will boil over inside the cavity and can make the chicken difficult to balance. You want enough liquid to steam without overflowing.
✗ Mistake: Lifting the grill lid constantly to check on things.
✓ Fix: Every time you open the lid, you drop the grill temperature by 25–50°F and add extra time to your cook. Trust the process, maintain your target temperature, and check the internal temp with a thermometer — not your eyes.
✗ Mistake: Skipping the resting period after pulling the chicken off the grill.
✓ Fix: At least 10–15 minutes of rest is mandatory. Cut into the bird too early and all those beautiful juices run right onto your cutting board instead of staying in the meat. Tent it loosely with foil and walk away — patience pays off in a huge way here.
Recipe Variations
The classic recipe is outstanding, but here are four ways to put your own spin on it:
🌶️ Spicy Southwest Version: Double the cayenne in the dry rub and add 1 teaspoon of chipotle powder for a deep, smoky heat. Swap the beer for a can of jalapeño-infused broth or a spicy pale ale. Serve with grilled corn salsa and a cool avocado crema to balance the fire — this one is a serious crowd-pleaser at cookouts where folks love heat.
🍯 Honey Bourbon BBQ Glaze Version: In the last 20 minutes of grilling, brush on a glaze made from 3 tablespoons of your favorite BBQ sauce, 1 tablespoon of honey, and 1 tablespoon of bourbon. Apply it in two thin coats, letting it set between applications. The result is a sticky, lacquered finish that looks like it came straight out of a BBQ joint — absolutely stunning on a platter.
🌿 Herb and Lemon Version: Swap out the chili powder and cayenne in the rub for 1 teaspoon of dried rosemary, 1 teaspoon of dried thyme, and 1 teaspoon of lemon zest. Use a can of lemon-flavored sparkling water or white wine in place of the beer. The result is bright, aromatic, and incredibly elegant — perfect for a dinner party where you want something a little more refined than classic BBQ.
♨️ Pellet Smoker / Traeger Version: Set your pellet smoker to 275°F and use cherry or hickory pellets for incredible smoke flavor. Follow the exact same recipe, but expect a slightly longer cook time of 2 to 2.5 hours at the lower temperature. The low-and-slow approach on a smoker builds an even thicker, more complex bark and infuses deep wood-smoke flavor throughout the entire bird that you simply cannot replicate on a gas grill. This is the absolute pinnacle version of this recipe.
Final Thoughts
This grilled beer can chicken with BBQ dry rub is one of those recipes that looks like you spent all day mastering it, but really just asks you to mix a rub, prep a bird, and let the grill do the heavy lifting. The result — juicy, smoky, crackling-skinned perfection — is something every backyard cook should have in their arsenal, and once you make it, you’ll be making it all summer long.
Now fire up that grill, crack open a cold one (save one for the chicken), and get ready to become the most popular person at every cookout this season. If you try this recipe, I’d love to see it — drop a comment below, leave a star rating, or tag me on Pinterest with your beautiful bird. 🔥🍺🐔
Frequently Asked Questions
What is beer can chicken and how does it work?
Beer can chicken is a grilling method where a whole chicken is placed upright over a partially filled can of beer on the grill. As the grill heats up, the beer slowly steams inside the cavity, keeping the meat incredibly moist from the inside while the dry rub and indirect grill heat create a crispy, smoky crust on the outside. It’s a simple technique with absolutely spectacular results.
What kind of beer is best for beer can chicken?
A classic American lager — Budweiser, Coors, Miller High Life — is the traditional choice and works perfectly. The beer flavor is very subtle once cooked. If you want to experiment, a pale ale or amber adds a gentle hop note that pairs nicely with smoky BBQ rub. Avoid very dark beers like stouts, which can impart a bitter edge. Honestly, whatever beer you’re already drinking at the cookout is the right answer.
Can I make beer can chicken in the oven?
Absolutely. Preheat your oven to 375°F. Place the seasoned chicken on the beer can and set it upright in a roasting pan or cast iron skillet to catch drips. Roast for 60–90 minutes until the internal temperature in the thigh reaches 165°F. You won’t get the same smoky char as on the grill, but the inside will be just as juicy and the rub will still form a beautiful crust.
How long does it take to grill beer can chicken?
At a grill temperature of 350°F–375°F using indirect heat, a 3½ to 4½ lb chicken takes approximately 60–90 minutes. Larger birds (5 lbs+) may need up to 2 hours. Always cook to an internal temperature of 165°F in the thickest part of the thigh — that’s your true done signal, not the clock.
Is it safe to cook chicken on a beer can?
Yes, it is safe when done correctly on a grill at proper food-safe temperatures. Ensure the chicken reaches an internal temperature of 165°F throughout. Use a beer can that hasn’t been opened near chemicals or sprays, and avoid cans with a plastic liner if you can — most standard aluminum beer cans are fine for this method. If you want complete peace of mind, several companies sell purpose-built stainless steel beer can chicken holders that work identically.
Can I use a chicken rub from the store instead of making my own?
You sure can. A good store-bought BBQ rub like Killer Hogs, Traeger Pork & Poultry, or McCormick Grill Mates works well. That said, the homemade rub in this recipe is specifically balanced for whole chicken — the brown sugar, smoked paprika, and spice ratios are dialed in for exactly the bark and flavor profile this recipe delivers. It’s worth the five minutes to mix it yourself at least once.
How do I keep the chicken from falling over on the grill?
A few things help: make sure the beer can is only two-thirds full (not completely full), position the two drumsticks slightly forward as a front support tripod, and place the setup on a flat, stable section of your grill grates. You can also use a purpose-built beer can chicken rack, which holds everything steady and makes transferring the bird on and off the grill much safer and easier.
Can I make this recipe on a Traeger or pellet smoker?
Yes, and it’s honestly the best possible way to make this recipe. Set your Traeger or pellet smoker to 275°F with cherry or hickory pellets. Follow all the same steps — the cook time increases to about 2–2.5 hours at the lower temperature. The payoff is extraordinary: a thicker bark, deeper smoke ring, and wood-infused flavor throughout every bite of the meat. If you have a pellet smoker, this is the version you want to make.