
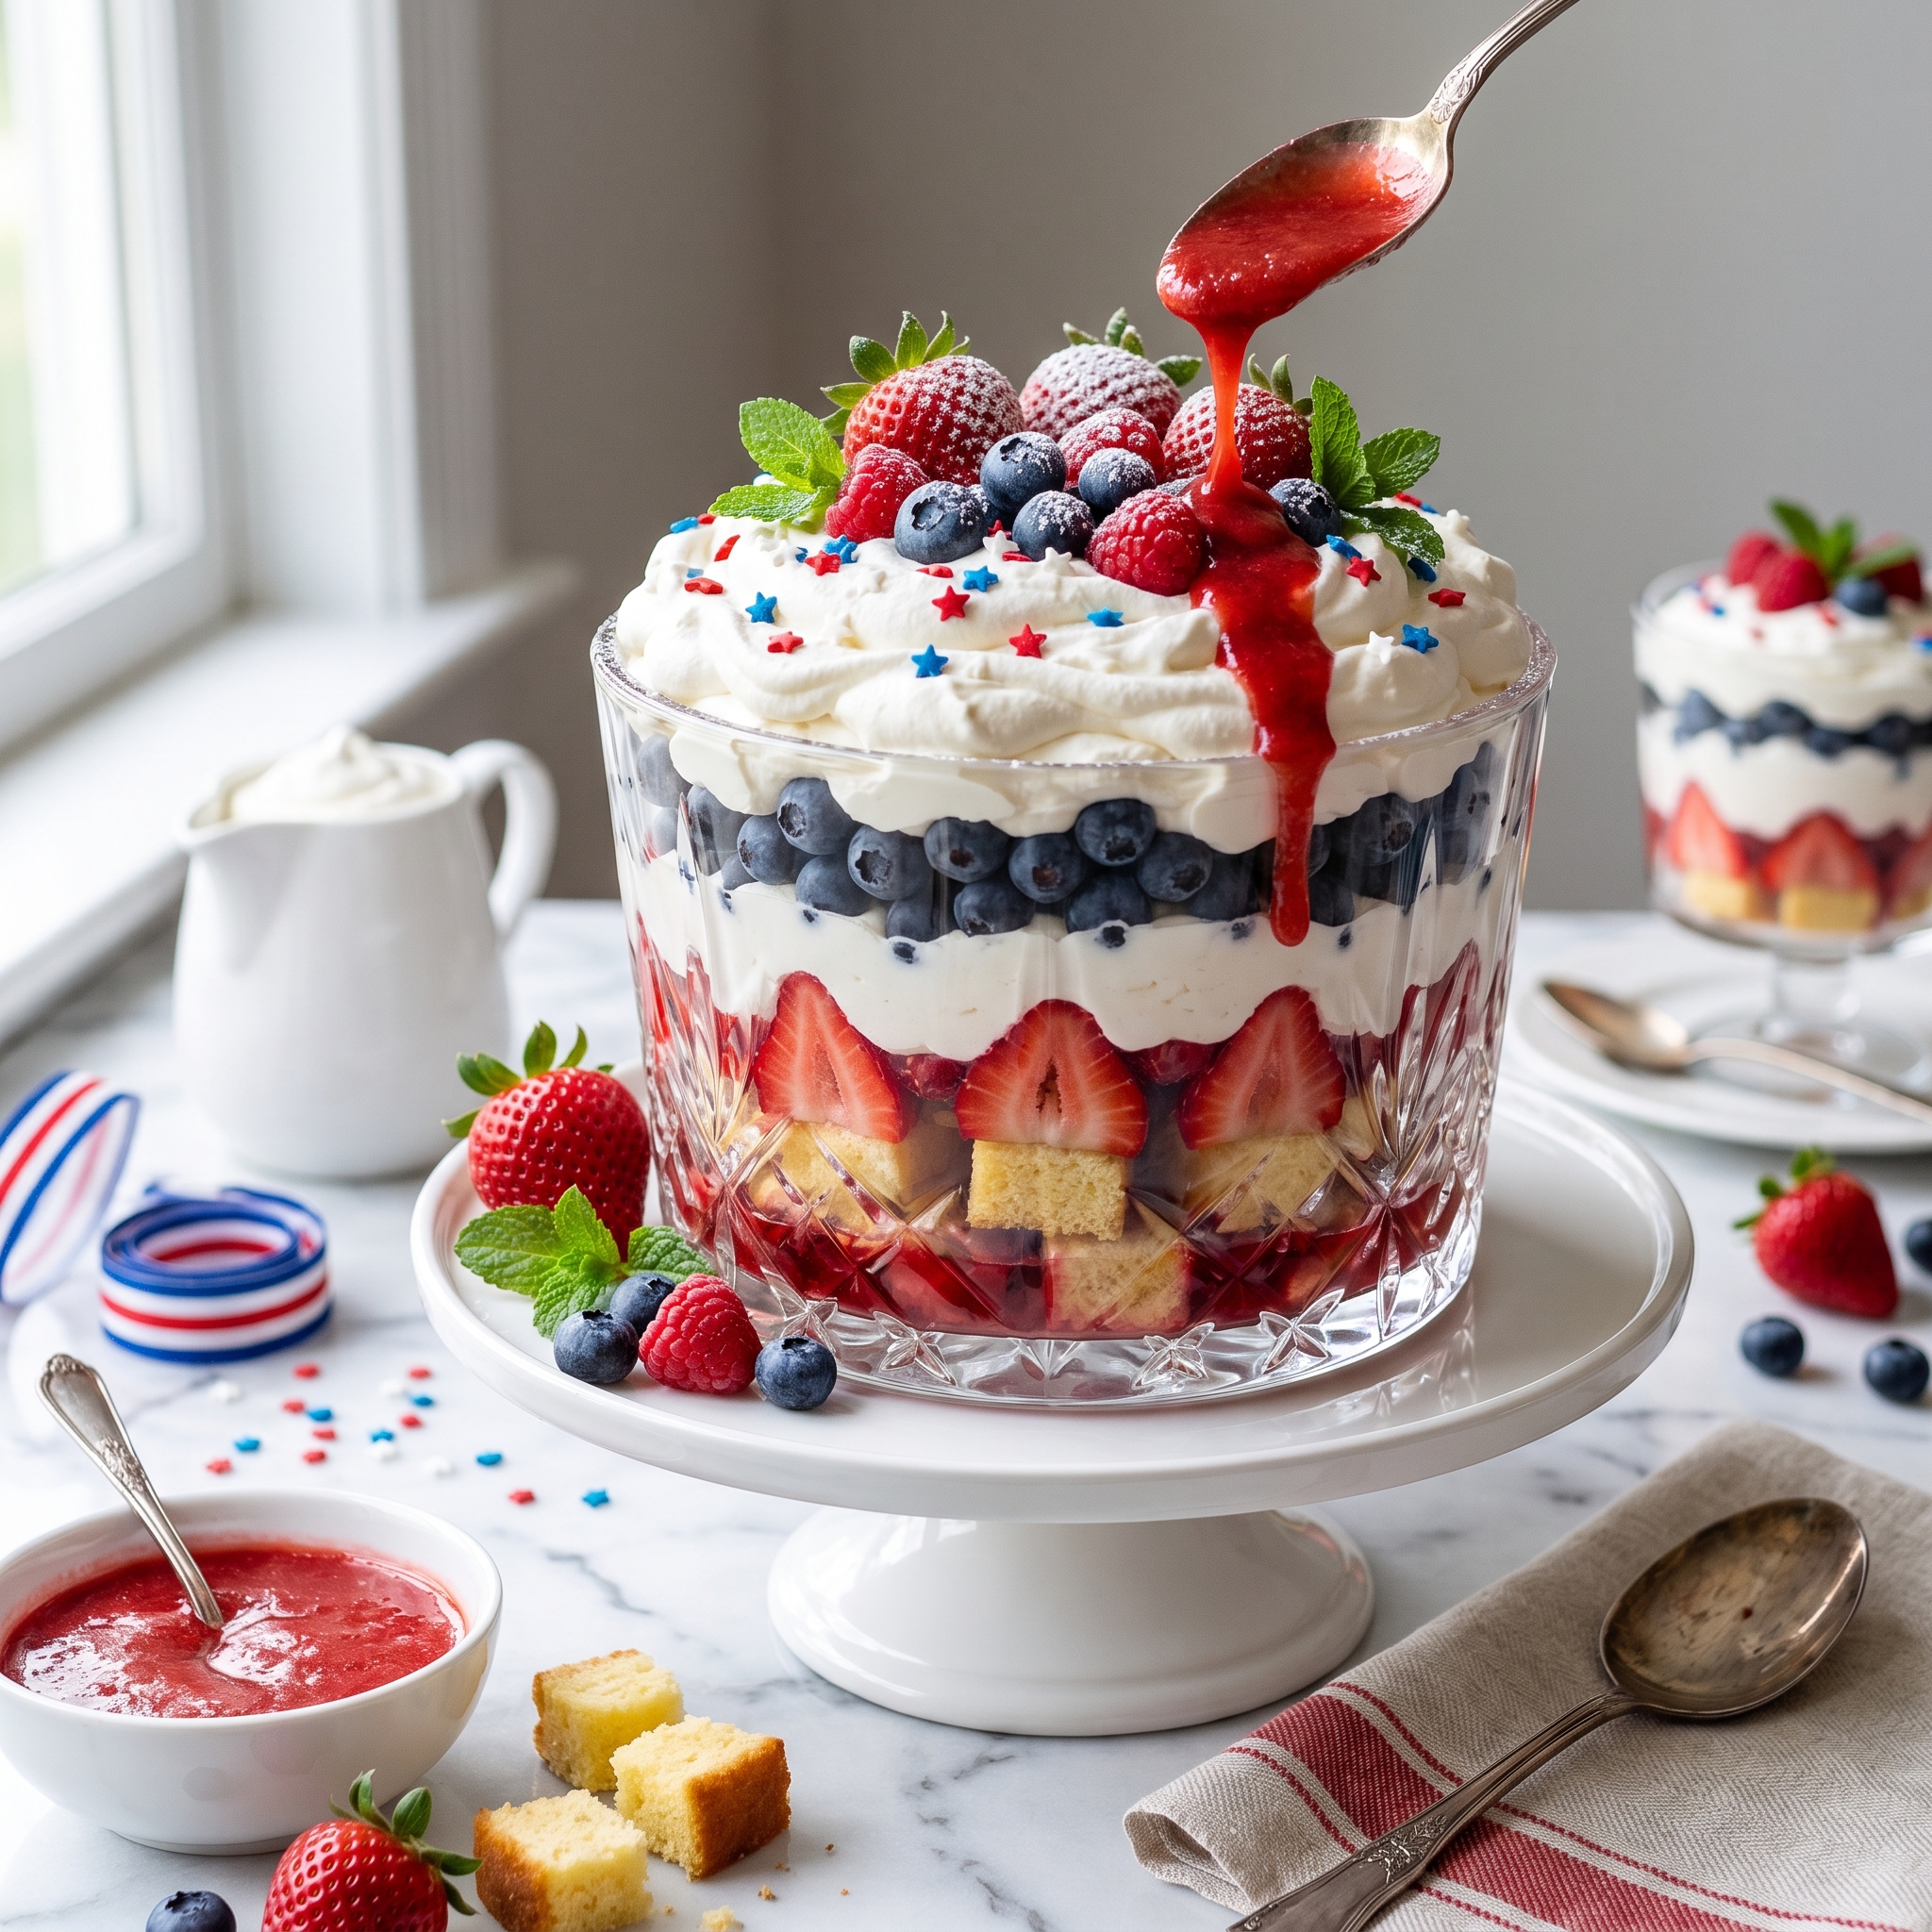
Easy Red, White, and Blue Berry Trifle for 4th of July
Imagine setting down a towering glass bowl or individual jars filled with gorgeous layers of fluffy cream, sweet cake, and vibrant red strawberries and blue blueberries — and watching everyone’s faces light up at how perfectly patriotic and beautiful it looks. That’s the magic of a red, white, and blue berry trifle. It’s the ultimate 4th of July or Memorial Day dessert that looks incredibly impressive but is secretly one of the easiest things you’ll ever make. No baking required if you use store-bought cake, just layer and chill, and you’ve got a showstopper.
Can I be real with you for a second? I used to think trifles were complicated British desserts that required special skills and fancy equipment. But have you ever made something so simple that you felt almost guilty at how much praise you got for it? That’s what happens with trifles. Layer cake, cream, and fruit. That’s it. Yet somehow it looks like you went to pastry school and spent hours creating this masterpiece. The secret is in those beautiful visible layers through the glass.
Whether you’re hosting a 4th of July BBQ, bringing dessert to a Memorial Day potluck, need something patriotic for a summer birthday, or just want to celebrate America with something delicious, this trifle is your answer. Keep reading — I’m sharing every tip and trick to make the most beautiful, delicious red, white, and blue trifle that’ll have everyone asking for the recipe.
Table of Contents
Why This Recipe Works
This isn’t just berries and cream thrown in a bowl. Here’s why this red, white, and blue berry trifle is about to become your go-to patriotic dessert:
- ✔ Absolutely stunning presentation — those visible layers are Instagram-perfect
- ✔ No baking required — use store-bought pound cake or angel food cake
- ✔ Make-ahead friendly — actually better when made a few hours ahead
- ✔ Feeds a crowd — one trifle serves 10–12 people easily
- ✔ Perfect for summer — light, fruity, and refreshing
- ✔ Customizable — make it in a big bowl or individual jars
- ✔ Kid-approved — sweet berries and cream never fail
Trust me, once you see how easy this is and taste those fresh berries with fluffy cream and tender cake, you’ll be making it for every patriotic holiday. Now let’s talk about what you’ll need.
What You’ll Need
For the Cake Layer
- 1 store-bought pound cake or angel food cake (about 16 oz)
- OR 1 box vanilla cake mix, baked according to package directions
- OR homemade vanilla sponge cake
For the Cream Layer
- 2 cups heavy whipping cream, cold
- ⅓ cup powdered sugar
- 1 teaspoon vanilla extract
- 8 oz cream cheese, softened (optional, for stability)
For the Berry Layers
- 2 cups fresh strawberries, hulled and sliced
- 2 cups fresh blueberries
- 2–3 tablespoons granulated sugar (to macerate the berries)
Optional Additions
- 1 package (3.4 oz) instant vanilla pudding mix (for extra creaminess)
- Fresh mint leaves for garnish
- White chocolate shavings
- Extra berries for decorating the top
You’ll Also Need
- One large glass trifle bowl (8–10 cup capacity)
- OR 8–10 individual glass jars or parfait cups
Substitutions
No fresh berries? Frozen berries work in a pinch — thaw and drain them well first. Can’t find a trifle bowl? Use any large clear glass bowl or even a clear punch bowl. Want to save time? Use Cool Whip instead of homemade whipped cream (you’ll need about 2 containers). No pound cake? Ladyfingers, shortcake biscuits, or even vanilla wafers work. Want to add more flavor? Brush the cake layers with a little berry juice or even a splash of liqueur for adults. For a lighter version, use Greek yogurt mixed with whipped cream instead of all cream.
Chef’s Note — The Clear Container: The whole point of a trifle is showing off those beautiful layers! You need a clear glass bowl or individual jars so people can see the red, white, and blue layers. That visual impact is what makes this dessert so special and festive. A regular serving bowl just won’t have the same wow factor. Trifle bowls are inexpensive and reusable, or you can use any clear glass container you have.
Chef’s Note — Fresh Berries: Since the berries are the star and provide all the patriotic color, use the freshest, ripest berries you can find. Summer is peak berry season, which is perfect since 4th of July and Memorial Day fall right in that window. Look for strawberries that are deep red all the way through and blueberries that are plump and firm. The quality of your berries makes or breaks this trifle!
Got everything ready? Perfect — let’s layer this beautiful patriotic dessert step by step.
How to Make Red, White, and Blue Berry Trifle — Step by Step
- Prep the berries. In two separate bowls, toss the sliced strawberries with 1–2 tablespoons of sugar, and the blueberries with 1 tablespoon of sugar. Let them sit at room temperature for 15–20 minutes to macerate — this draws out their natural juices and makes them sweeter. Keep them separate so the colors don’t bleed together.
- Prepare the cake. Cut your pound cake or angel food cake into bite-sized cubes — about 1-inch pieces. You want them small enough to be easy to eat with a spoon but substantial enough to hold up when layered. Set aside.
- Make the whipped cream. In a large bowl, combine the cold heavy cream, powdered sugar, and vanilla extract. Using an electric mixer, beat on medium-high speed until stiff peaks form — about 3–4 minutes. The cream should be thick, fluffy, and hold its shape when you lift the beaters. If using cream cheese for stability, beat the softened cream cheese first until smooth, then add the cream mixture and beat together.
💡 Pro Tip: For the most stable whipped cream that won’t weep or deflate, add the cream cheese! Beat 8 oz of softened cream cheese until smooth, then gradually add the whipped cream and fold together. This creates a cream that holds up beautifully for hours and tastes like cheesecake filling.
- Start layering — cake first. Place a layer of cake cubes in the bottom of your trifle bowl, covering the entire bottom. You want about one-third of your cake for the first layer. Press down gently to create an even base. The cake doesn’t need to be perfectly arranged — rustic and casual looks great!
- Add the strawberry layer. Spoon about half of the macerated strawberries (with some of their juices) over the cake layer. Spread them evenly so every bite will have berries. The red juice will soak into the cake and add flavor — that’s a good thing!
- Add a cream layer. Spoon or pipe about one-third of the whipped cream over the strawberries. Spread gently to cover, creating a distinct white layer. You can use a piping bag for neater layers, or just spoon it on for a more rustic look — both are beautiful!
💡 Pro Tip: For the cleanest, most visible layers, wipe the inside of the bowl with a damp paper towel after each layer if anything gets smeared on the glass. This keeps those layers sharp and beautiful!
- Repeat with blueberries. Add another layer of cake cubes (half of what remains), then the blueberries (all of them), then another layer of whipped cream (half of what remains). You’re building: cake → strawberries → cream → cake → blueberries → cream.
- Final cake and cream layer. Add the remaining cake cubes, then top with the final layer of whipped cream. Use a spatula or the back of a spoon to create swoops and swirls in the top layer of cream for a pretty finish.
- Decorate the top. Arrange the remaining strawberries and some extra blueberries on top in a decorative pattern. You can make stripes, a star pattern, or just scatter them artfully. Add fresh mint leaves or white chocolate shavings if desired. This is your patriotic canvas — make it beautiful!
💡 Pro Tip: For maximum visual impact, arrange the top berries in an American flag pattern — alternating rows of strawberry slices for the stripes, with a square of blueberries in the corner for the stars. It takes 5 extra minutes but looks incredibly impressive!
- Chill until serving. Cover the trifle with plastic wrap and refrigerate for at least 2 hours, or up to 24 hours. This chilling time lets the flavors meld together and allows the cake to soak up the berry juices and cream, creating that perfect trifle texture. It’s even better the next day!
That’s it — now let’s talk about all the occasions perfect for this stunning dessert.
How to Serve It
This red, white, and blue berry trifle is perfect for so many summer celebrations. Here’s how we love to serve it:
- 🎆 4th of July centerpiece — place the trifle bowl in the center of your dessert table and let guests serve themselves
- 🇺🇸 Memorial Day potluck — individual jars with lids make this portable and perfect for outdoor gatherings
- 🎂 Summer birthday cake alternative — lighter and more refreshing than traditional cake
- 🏖️ Beach house dessert — no-bake makes it perfect for vacation cooking
- 🎓 Graduation party — use school colors by swapping berry types (raspberries, blackberries, etc.)
- 🥄 Individual servings — make them in mason jars or parfait glasses for easy grab-and-go portions
However you serve it, make sure to scoop all the way down to get every layer in each serving — that’s the beauty of a trifle! Now let’s cover storage and make-ahead tips.
Storage & Leftovers
Refrigerator: Store covered in the fridge for up to 2–3 days. The whipped cream will soften and the cake will continue to absorb the berry juices, which actually makes it taste even better. The layers will blend together more as it sits, but it’s still delicious.
Freezer: Don’t freeze trifle — the whipped cream and fresh berries don’t freeze well. They become watery and the texture changes significantly when thawed. This is meant to be enjoyed fresh or refrigerated.
Counter: Don’t leave the assembled trifle out at room temperature for more than 2 hours. The whipped cream and berries need to stay cold.
Make-Ahead Tip: This is actually the PERFECT make-ahead dessert! It needs at least 2 hours to chill anyway, so you can (and should) make it the day before your party. In fact, it tastes even better after sitting overnight as the flavors meld together and the cake soaks up all those delicious berry juices. Make it in the morning or the night before, keep it covered in the fridge, and just add the final decorative berries on top an hour before serving for that fresh-made look. For maximum efficiency, prep the components separately: whip the cream and store covered, macerate the berries in separate bowls, and cube the cake. Then assemble 4–6 hours before the party. This way you’re not scrambling at the last minute!
Individual Jars for Crowds:
If you’re making individual trifles in jars, you can prep them the day before and stack them in the fridge. Add lids for transport to picnics or potlucks. This makes serving so easy — just hand everyone a jar and a spoon!
Coming up next — the mistakes that can ruin a beautiful trifle, and exactly how to avoid them.
Helpful Tips & Common Mistakes
I’ve made many trifles over the years. Here are the mistakes people make, and how to get perfect results:
✗ Mistake: Not using a clear container and losing the whole visual impact.
✓ Fix: The visible layers are what makes a trifle special! Use a clear glass trifle bowl, punch bowl, or individual glass jars. An opaque serving dish ruins the effect — you can’t see the beautiful red, white, and blue layers that make this so patriotic and impressive.
✗ Mistake: Overbeating the whipped cream and making butter.
✓ Fix: Stop beating as soon as you see stiff peaks — the cream should hold its shape and stand up straight. Keep going and the fat will separate, giving you butter and liquid. Watch closely and stop at the right moment. Underbeating is better than overbeating!
✗ Mistake: Using wet berries that make the trifle watery and soggy.
✓ Fix: Wash your berries and dry them completely before using. Pat them dry with paper towels or use a salad spinner for blueberries. Excess water dilutes the flavors and makes everything soggy. Dry berries = better texture and more intense flavor.
✗ Mistake: Assembling too early and having the colors bleed together into muddy purple.
✓ Fix: You can assemble up to 24 hours ahead, but the closer to serving time, the more distinct the layers will be. The berry juices naturally bleed into the white cream and cake over time — it’s still delicious, just less visually striking. For the most beautiful presentation, assemble 2–6 hours before serving.
✗ Mistake: Not macerating the berries and having bland, hard fruit.
✓ Fix: Toss those berries with a little sugar and let them sit for 15–20 minutes! This draws out their natural juices, makes them sweeter, and creates that delicious syrup that soaks into the cake. Don’t skip this step — it transforms the berries from good to amazing.
Follow these tips and you’ll have a stunning, delicious trifle with beautiful distinct layers that tastes as good as it looks. Now let’s talk variations.
Recipe Variations
Once you’ve mastered the classic red, white, and blue version, here are some delicious ways to customize it:
🍓 All-Strawberry Version: Use only strawberries and create alternating layers of berries and cream for a classic strawberry trifle. Add a layer of strawberry jam spread on some cake pieces for extra strawberry intensity. Perfect when strawberries are at peak season!
🍫 Chocolate Berry Trifle: Use chocolate cake instead of vanilla, and add a layer of chocolate pudding or chocolate whipped cream between the berry layers. The combination of chocolate with fresh berries is incredible — like chocolate-covered strawberries in trifle form.
🍋 Lemon Berry Trifle: Use lemon pound cake and add lemon curd layers along with the whipped cream. The tangy lemon with sweet berries is bright and refreshing. Top with lemon zest for extra zing.
🎉 Mixed Berry Version: Add raspberries and blackberries along with the strawberries and blueberries for a “mixed berry explosion” trifle. Use all the berries together in each layer for maximum berry flavor and gorgeous jewel tones throughout.
Pick your favorite variation and make it your own — the layering technique works with endless flavor combinations!
Ready to Celebrate America Deliciously?
This red, white, and blue berry trifle is the ultimate patriotic dessert that looks incredibly impressive but is secretly so easy that you’ll feel almost guilty accepting all the compliments. Those gorgeous visible layers, the fresh berry flavor, the fluffy cream, the tender cake — it all comes together into something that tastes like summer and celebrates America in the most delicious way possible. Whether you’re feeding a crowd at a backyard BBQ or bringing dessert to a potluck, this trifle is guaranteed to be the star of the dessert table.
If you try this recipe, I’d love to hear how it turned out! Drop a comment below or tag me on Pinterest with a photo of your beautiful patriotic trifle. Happy celebrating, friends! 🇺🇸
Frequently Asked Questions
Can I make this the day before?
Absolutely! In fact, it’s often better the day after as the flavors meld together and the cake soaks up the berry juices and cream. Make it up to 24 hours ahead and keep covered in the fridge. Just add the final decorative berries on top a few hours before serving for the freshest look.
Do I need a special trifle bowl?
No! Any clear glass bowl works — a punch bowl, large glass serving bowl, or even a clear salad bowl. You can also make individual trifles in mason jars, parfait glasses, or clear plastic cups. The key is using clear glass so you can see the beautiful layers.
Can I use Cool Whip instead of making whipped cream?
Yes! Cool Whip or other whipped topping works great and is much easier. You’ll need about 2 containers (16 oz total) to replace the homemade whipped cream. The flavor won’t be quite as rich, but it’s perfectly delicious and more stable for make-ahead.
How do I keep the layers from blending together?
Some blending is natural and okay — it’s part of trifle! To minimize it: (1) Don’t assemble too far ahead (2–6 hours is ideal). (2) Drain excess juice from berries before layering. (3) Make sure each layer is relatively thick and distinct. (4) Keep berries separate (don’t mix strawberries and blueberries in the same layer).
Can I use frozen berries?
You can, but fresh is really best for both texture and appearance. If using frozen, thaw completely and drain very well — frozen berries release a lot of liquid that can make the trifle watery. Pat them dry with paper towels before using.
What if I don’t have time to macerate the berries?
You can skip it and use the berries fresh, but macerating really does improve the flavor and creates that delicious syrup that soaks into the cake. If you’re short on time, at least toss them with the sugar and let them sit while you prepare the other components — even 10 minutes helps!
How do I transport this to a party?
If using a trifle bowl, cover tightly with plastic wrap and transport in a cooler with ice packs to keep it cold. Individual jars are easier to transport — just put lids on them and stack in a box or carrier. Keep cold until serving!
Can I add alcohol to this for adults?
Yes! Brush the cake layers with a little berry liqueur, rum, or even champagne before layering. You can also add 2–3 tablespoons of liqueur to the whipped cream. This makes it more sophisticated for adult parties while keeping it family-friendly on top.